- Downloaded code from GIT hub using git clone
- To upload the code I have created a bucket in S3
- Then I have created an IAM role with permissions like AmazonSSMManagedInstanceCore and AmazonS3ReadOnlyAccess
These policies will allow our instances to download code from S3 and use systems manager Session Manager to securely connect to our instances without SSH keys through the AWS console.
NETWORKING and SECURITY
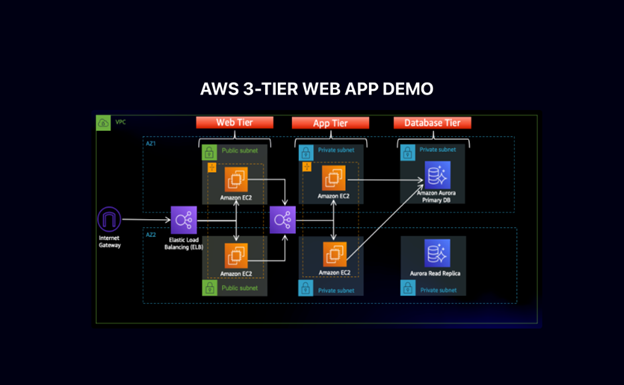
- I have created a VPC with the CIDR range (10.0.0.0/16) and created 6 subnets where 3 subnets will be in one Availability zone and 3 will be in another one.
Public-Web-Subnet-AZ-1, Private-App-Subnet-AZ-1, Private-DB-Subnet-AZ-1.
- Created Internet gateway for the public subnets in VPC and attach it to the VPC.
- Created NAT gateways for the instances in the app layer private subnet to be able to access the internet they will need to go through the NAT gate way. For high availability, I have deployed one NAT gateway in each of my public subnets.
- Created two route tables for public and private subnets and then edited the Routes by adding destination and targets that directs traffic from the VPC to the internet gateway for public subnet and NAT gateway for private subnet.
- Created security groups to tighten the rules around which traffic will be allowed to our Elastic load balancers and EC2 instances.
Internet-facing-lb-sg, web-tier-sg, internal-lb-sg, private-instance-sg, DB-sg.
DATABASE DEPLOYMENT
- Created a DB subnet group in RDS by adding the subnets that I have created in each AZ specifically for DB layer.
- Provided all the configuration which will be needed to create a DB and I would get a reader and writer instance in the database subnets of each availability zone.
App Tier Instance Deployment
- App instance deployment: Created an EC2 instance for the app layer and make all necessary software configurations so that the app can run. The app layer consists of a Node.js application that will run on port 4000. I have configured the database with some data and tables.
- Connect to instance: Then connected to the App layer instance using Session Manager using sudo -su ec2-user
Configure database:
- Configure database: Installed MySql CLI and then initiated DB connection with the RDS writer instance end point.
- Created Db and Table and inserted some sample data.
- Configure app instance: upload the app-tier folder to the S3 bucket and in SSM we need to install all of the necessary components to run the backend application. And install pm2 as well to keep our node.js app running when we exit the instance or if it is rebooted.
Internal load Balancing and Auto Scaling
- Created an Amazon machine image (AMI) of the app tier instance that I have created, and use that to set up autoscaling with a load balancer in order to make this tier highly available.
- Created target group to use with the load balance.
- Created an application load balancer with internal as this one will not be public facing, but rather it will route traffic from web tier to the app tier.
- Selected the sg that I have created for this internal ALB, now this ALB is listening for HTTP traffic on port 80. It will be forwarding the traffic to the target group that I have created earlier.
- Before configuring Auto scaling, need to create launch template with the AMI that I have created earlier.
- Created auto scaling group with the launch template that I have created for two private app instances in two AZs (private-app-subnet-AZ1, private-app-subnet-AZ2) and then attach it to appTierTargetGroup – ALB
WEB TIER INSTANCE DEPLOYMENT
- Update the config file: Before we create and configure the web instances, open up the application-code/nginx.conf file from the repo we downloaded.
- Replace [INTERNAL-LOADBALANCER-DNS] with your internal load balancer’s DNS entry. You can find this by navigating to your internal load balancer’s details page.
Web instance Deployment
- Launch an ec2 instance as WebLayer in public web subnet az1
- Connect to the instance in ssm using sudo -su ec2-user
- Configure web instance by running all the necessary components needed to run the front-end application.
Leave a Reply